Choosing your Gunnar
What are the differences between the Fastland and the Hyper-X
The Fastlane is designed as a commuter/tourer while the Hyper-X is a race-ready frame that can be used for light commuting and other distnace riding. More detail differences are:
- Handling: The Hyper-X has faster steering than the Fastlane.
- Comfort: The Fastlane's longer wheelbase and more upright riding position provides a more comfort oriented fit and soaks up road shock somewhat more than the Hyper-X.
- Components: The Fastlane is designed for quick realease hubs and post or ISO mount disc brakes. The Hyper-X comes in a variety of configurations - the XF version fits 12mm through-axle with flat mount brakes, while the XX and XC fit a variety of brake types.
- Tire Choices: Both provide 51mm of space between the stays allowing 700C tires up to 43mm wide. These larger tires help increase comfort and reliability.
- Fully heat treated air-hardening tubeset.
- The same craftsmanship and attention to detail.
You'll have a great bike either way!
What are the differences between the Roadie and the Sport
The major differences are:
- Handling: The roadie has fast steering race handling while the sport has a more general purpose road handling. While serviceable for citizen's racing, the sport excels at long-distance riding.
- Comfort: The Sport's longer wheelbase soaks up road shock somewhat more than the Roadie's short wheelbase.
- Tire Choices: Thanks to its 57mm dual pivot brake compatibility, the Sport can fit up to 32C tires and fenders with tires up to 28C. These larger tires help increase comfort and reliability.
- Fully heat treated air-hardening tubeset.
- Same great fit and riding position.
- The same craftsmanship and attention to detail.
You'll have a great bike either way!
Which Gunnar is better for touring?
If you're talking about supported or credit card touring, all are excellent choices. The CrossHairs has more tire clearance, but the 28C tires typical of light road touring will fit both bikes.
In recent years, the geometries for all three bikes have moved closer together. There is only a 5mm difference in the theoretical top tube lengths between the bikes - and only 10mm on the head tube heights. The CrossHairs, designed for cyclocross racing, has a higner bottom bracket and a less sloped top tube, in some cases necessitating you to choose the next smaller size than the comparable Sport if competition is part of your plan.
Neither the CrossHairs nor the Sport are designed for full scale unsupported touring. You'll want to keep your loads limited to about 20 pounds (10kg). Much more than that and you increase the chance for high-speed wobble, the bane of loaded tourists. The Fastlane's beefier top and downtube make it more feasible for loaded touring as well as an ultra-reliable commuter.
If loaded touring is your goal, consider the Grand Tour (cantilever brakes) or the Grand Disc (disc brakes). These models have stable handling for long distances, high load carrying capacity, and other factors, such as longer chainstays for increased heel clearance plus a third set of water bottle bosses.
Can I use the Rock Tour for Road Touring?
The Rock Tour is designed for off-road touring and exploration. Its relatively short top tube allows riders to mount drop bars as well as flat bras and maintain a reasonable fit. The 19" 29er Rock Tour comes quite close to the 56cm Fastlane, with an only modest stem swap. When using comparable tires, the Rock Tour has a slightly lower standover height.
Fastlane 56cm vs. the Rock Tour 29er 19"
The 19" is the smallest 29er size. Smaller riders will find that they'll need a 2cm shorter stem plus 15mm more headset spacers to match the fit on a comparable Fastlane, as shown in the links below:
Fastlane 52cm vs. Rock Tour 17.5 inch
What happens if I mount 650B wheels with 35C tires on a Gunnar Sport or Roadie?
Let's pretend that you could change brakes to allow the brake calipers to make proper contact with the rims, the If you put 650B's on a bike designed for 700C wheels, your brakes won't reach the rims and your crank is much more likely to hit the ground during turns. What's more, the neither the Roadie's 49mm reach brakes or the Sport's 57mm reach brakes might not clear 35C tires, especially if you're using fenders. You can order a custom Gunnar for 650B wheels.
Repairs, Restorations and Conversions
Can I install S&S Couplers on my existing Gunnar?
S&S couples allow your bike to be disassembled to fit into a case which can be checked on to most airlines without an excess size charge. For people whe travel with their bikes often, this can save considerable expense. Gunnar offers an S&S coupler option on new frames.
Unfortunately, nearly all existing Gunnars cannot be converted because of the need to replace their relatively light tubes for ones suitable for use with the couplers. The cost of doing so, along with a few technical issues associate with such tube replacements, means that we don't make such conversions. A new bike would not cost much more money.
How can I install a 1 inch steerer fork into a 1-1/8 inch compatible head tube?
You can install a Problem Solvers Headtube Reducer. It reduces 34mm to 30.2mm (1-1/8" to 1" headset) HD9901.
I have an older bike, how big a tire can it fit in it?
When Gunnar first started up, we provided what seemed at the time to be generous tire clearance for the available tires. Over time, tires of every size have gotten larger (often without changing the labeled size), and there is also general interest in bigger tires. Our records do not document stay spacing on older bikes, so it will require you to do some legwork to determine if a a tire will fit or not.
You'll need three pieces of information to answer this question:
- What kind of brakes are on the bike?
- How big is the space between the stays where the tire sits?
- How wide/tall is the tire.
Type of brakes:
Caliper brakes have limits in their design:
- Short reach brakes (39-49mm) can only fit properly labeled 28's.
- Medium reach brakes (47-57mm) can fit as much as properly labeled 35C tires without fenders.
- Long reach brakes (57-73mm) can fit up to 38C tires with fenders.
Disc and Cantilever brakes:
Cantilever brakes can support up to 60mm wide tires. , but are constrained by other factors:
- Bridge and fork height.
- Chain stay and seat stay spacing -the distance between the stays at the widest point of the tire.
Stay spacing: The space between the stays tells you how wide a tire you can fit. Ideally, there would be 6mm (1/4 inch) between the tire and the stays. if you find 50mm between the stays, you can safely fit 38mm wide tires. You can get away with fatter tires, but there's an increasing risk of messing up the paint as you go below 6mm per side.
Where to measure the stay spacing?
- 700C/29er Tires: 340-360mm from the axle.
- 650B: 320-330mm from the axle.
- 26 inch: 305-315mm from the axle.
We don't have complete data on tire clearance for older Gunnars, so it's best to measure your bike rather than make assumptions on the tire that can fit.
Measure the tire: Tire manufacturers label tires to meet a market need. They seem not to want to be seen as selling undersized tire. As a result the labeled tire size doesn't match the actual tire size. For example, Continental GP 4000 28C tires measure 31mm wide, meaning that it won't fit under 49mm brakes. So find out the actual width befoire you buy.
Design and Features
How do you measure your frames, center to center or center to top?
Historically, we measured center (of the bottom bracket) to top (of the seat tube). With the advent of sloped top tube designs, we actually need more ways to measure frame dimensions, which you can see with the Gunnar Fit Tool. Here's the current list:
- Center to top - to the top to the seat tube.
- Center to center - to the top tube seat tube intersection.
- Theoretical center to center - this is established by the designer. Often, we define this based on classic road sizing.
- Effective center to center - this is a point horizontal to the intersection of the top tube and the head tube.
If you have a horizontal top tube design, the last three above end up the same.
On mountain bikes, sizing is based on traditional sizing numbers.
How come you don't put front derailleur braze-ons on your road bikes?
We put flexibility ahead to weight savings. In this case, the flexibility is very limited.
Braze-on front derailleurs are some 11-14 grams lighter than the clamp-on style. On the other hand, front derailleur bosses when brazed on weigh about 11 grams. For three grams you get the ability to raise and lower your derailleur to meet changing needs. Current braze-on derailleur mounts allow about a 2 tooth range (for example 52 to 54 teeth). That's a lot of inflexibility for three lousy grams.
We do recommend using a plastic shim over our typical 28.6mm diameter seat tube, to use in combination with a 31.6mm braze-on adapter. This preserves the paint and facilitates better shifting with today's derailleurs.
The reason many companies use braze-on front derailleurs is that their structure doesn't allow them to fit a clamp-on. They all wish they could.
Why the vertical dropouts on road bikes?
It makes it easier for people to get the rear wheel in and out. In the old days, horizontal dropouts with adjusting screws allowed you to keep the wheel centered when the frame was not aligned and the wheel not dished. Well, today we build our frames straight and we urge you to keep your wheel dished - for everybody's sake!
Why the low bottom bracket on your CrossHairs?
More blasphemy! "Traditional" cyclocrossers had higher bottom brackets than we've become used to on road bikes. That became the standard for the newer generation of cyclocross bikes. After all, most of the buyers were retro-geeks anyway.
But wait a minute! Traditional road bikes also had higher bottom brackets than they used to. We've learned that dropping the bottom bracket lowers your center of gravity and makes the bike more stable without compromising steering responsiveness. I'd think that would be pretty important when racing on mud, ice and snow. The only people who don't like the low bottom bracket are forced to race cyclocross on warmed over mountain bike cross-country tracks.
What is my bottom bracket width and why?
Bottom brackets come in two typical widths, 68mm and 73mm. The 73mm width is found on many off-road frames because of the need for increased tire clearance. In 2006-7, we adopted the 73mm wide bracket as our standard for the Rock Hound, Ruffian and Rock Tours. Our road models - the Roadie, CrossHairs, Street Dog, Sport and the Fastlane all keep the 68mm wide bottom bracket.
Why do you use 120mm rear spacing on the Street Dog?
Because this gives fixed gear affectionados the greatest range of fixed gear hubsets from which to choose.
How come my 27.2mm fits in so tightly in a Rock Hound?
We used to be able to tell you that you should use a 27.0 mm but we changed it to 27.2 mm last spring. So: If you have an older issue (Serial number C00001 or before plus a few later spring models) you might still need a 27.0mm post. Otherwise check that the seatpost is built to the right tolerance.
How come your CrossHairs, Street Dog, Sport and Roadie top tubes have a slope?
In medium and large sizes, the slope gets the top of the head tube back up to where it would be if we didn't have an external seat collar. Otherwise you'd need an extra 20mm of spacers on your headset.
They provide a tight clamp and are easy to replace.
Some riders - particularly larger off-road riders - will benefit from the clamping power of the Salsa Lip Lock clamp - order in the 30mm diameter. Pavement models (Roadie, Sport etc.) get a 28.6mm clamp.
What if I want to ride the Street Dog as a Single Speed?
No problem. Get flip-flop hubs, which fit a fixed gear on one side and a freewheel on the other.
When riding with a free wheel, it's especially important to mount both the front and rear brakes.
Why do you put all those holes in your frames? Won't they rust like crazy?
The holes insure that our frames drain properly - both before and after construction. We wash our frames at several points during fabrication. Allowing them to dry out quickly is critical for subsequent operations, particularly painting.
Water has a way of entering your frame in the darnedest ways. Water enters from condensation occurring when moving the bike from cold temperatures to hot ones. There's no way to prevent this form of infiltration. Our drain holes provide plenty of ventilation and thus evaporation of the moisture. Without them, the moisture has plenty of time to help create rust.
Of course, water can enter from riding through water, riding during hard rain or from washing. Just stand the bike on end and the water easily drains out the bottom. The remaining moisture evaporates in short order.
Anti-corrosion expert Peter Weigle corroborates our view that better ventilation minimizes corrosion better than so-called "sealed" systems. Of course, treating your frame with Weigle's Framesaver provides even better protection - particularly in humid or corrosive environments like Florida.
Since our factory repaints steel frames as much as sixty years old, we know that the material has fundamental durability with even modest care.
Track bikes are already pretty rare and yet we have a good supply of parts at several price points. 120mm is the standard spacing on track bikes.
Track wheels need fit only one or two cogs where our regular road wheel has 9 or 10, so there's less wheel dish and therefore a stronger wheel in spite of the narrower hub width. Track riders also like the lower Q-factor (the horizontal distance between the pedals).
There are enough good reasons to retain these standards that they won't go away any time soon.
Why do we fit a 1 1/8" steerer tube - even on road bikes?
1" steerer tubes were the standard for forks for generations, but, with the toughness needed for mountain biking and the extra diameter need for carbon fiber steerer tube road bikes, we updated all our designs to 1 1/8". Those who want to keep their 1" forks can install headset reducers which make 1" forks work with head tubes designed for 1 1/8" steerer. The reverse, of course, is not possible.
What is the fork height on a Gunnar?
For 26er's, it depends on the year built. For model years up to 2000, the axle to crown race is 410mm. For 2001 to the present, the axle to crown is 445.
If you have a 29er, the axle to crown is roughly 466mm.
Any taller and your front wheel will get you into trouble your rear wheel can't get you out.
Where do I find my serial number? Why is the serial number so important?
The serial number is always found on the bottom of the bottom bracket shell. You can find it on the parallel to the non-drive side edge, as shown below:
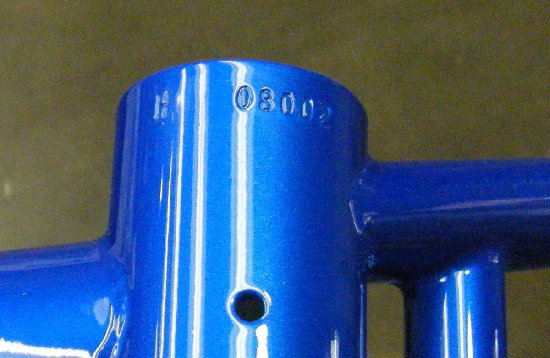
For purposes of entering your registering your bike, the space between the letters and the numbers are ignored. The example above would be recorded as H08002. Every Gunnar gets a serial number - even team and employee bikes. It is not unusual for numbers to be partially obscured by paint. If you are the original owner, your dealer should give you the serial number when you buy your Gunnar.
For used Gunnar buyers, we recommend that you get the serial number before you buy, especially if you want to ask us questions about the frame. If you have a description of the frame (including model, size, color, original owner name and/or dealer name), we can help you get the correct serial number even from a limited number of letters.
When you register your Gunnar, we use the serial number to connect you to the original order, so as to create accurate provenance records for the frame. We also include the ability to document any alleged theft of your Gunnar (though we do not report thefts to any authorities at this time).
Because every Gunnar has a serial number, you should be suspicious if your Gunnar does not have one, or if, when shopping, your seller cannot provide you with a serial number.
What does my Gunnar serial number mean?
A Gunnar serial number not only uniquely identifies a Gunnar, it also tells you the date of manufacture. Each serial number consists of three components:
- Letter indicating the month: The serial number starts with a letter indicating the month of manufacture, with A for January, B for February and so on. Gunnar skips I, which can be confused with a 1, so September becoms J, October K and December M.
- 2-digit year code: The next two digits are the year - 08 is for 2008, for example.
- 3-digit sequence number: This number is assigned as the serial numbers are allocated, which is the first step in fabrication.
In the example below, H08002 means the frame was the second sequence number allocated for August, 2008 production:
Materials and Structure
OS2 represents a significant leap in tubing design, taking advantage of the new generation of heat treated air-hardening tubes.
Traditional OS frames had a one inch top tube and 1 1/8 inch downtube. In the late 1980's, Gunnar's predecessor company, Paramount Design Group, revolutionized the pro bike world by introducing the OS design, expanding the downtube to 1 1/4" and the top tube to 1 1/8".
OS2 takes this a step farther with a 1 3/8" downtube and 1 1/4" top tube. This would not be possible without the development of air-hardening alloys.
The result is a lighter design with all the strength and durability you'd want in a high-performance steel frame.
What are air-hardening steels?
Air hardening steels are a class of steel alloys designed for high-performance applications like air-craft construction, automobile crash panels and bicycle frames. Of all these applications, the bicyle frame is the most demanding.
When they come from the factory, air hardening steels are about 10% stronger than chromoly steel and Reynolds' equivalent 531. Like chromoly and 531, air hardening steels can be heat treated. Heat treating can as much as double the strength of the tubing.
The big benefit for Gunnar of heat treated air-hardening steels is that when we TIG-weld them, the joints are much stronger than they would be if they were the older generation of alloy. The effect is a much more durable frame. It also allows us to lighten up the tubes while maintaining adequate strength.
Gunnar uses two types of heat treated air hardening alloys - True Temper OX Platinum and Reynolds 853. Gunnar has designed custom tubes to supplement these companies' standard offerings to achieve the highest overall performance.
Gunnar Dimensions
So what is right! Some people measure the size of a bike from the middle of the bottom bracket to the center of where the seat tube meets the top tube ("Center to Center"). Others, including ourselves, measure from the center of the bottom bracket to the top of the seat tube - including the clamp. Either way is fine. Seat tube length provides only a mild indication of frame size. The real indicators are top tube length and standover height.
How do you measure top tube length?
We measure the top tube length as the theoretical distance from the center of the head tube horizontally to where it would meet the seat tube if the seat tube was long enough. This is the best way to compensate for the different slopes from bike to bike and size to size. While this sounds a bit hairy, it does insure that you can reasonably predict the reach between the seat and the handlebars.
How do you measure standover height?
We measure it based on a typical tire in the middle of the top tube. You'll have a bit extra top tube clearance on the rear half of the bike and you'll find it a bit tight up front.
Paints and Finish
Up until the 2004, most Gunnar decals were placed over the paint. These decals can be replaced with the right technique. It starts with properly removing the existing decals. Gunnar used two different technologies of decals.
Plan A: Take your bike down to the local car wash. Using the pressure washer at an angle to the edge of the decal, attempt to "spray off" the decals. If they are right variety (most of the bikes up until the 2003 model year), they will come right off. The most recent version (the ones used in the 2003 model year) do not come off, so you'll have to go to plan B.
Plan B: Get a hair dryer and a credit card. Heat up the decal with the blow dryer until it feels hot but not burning. This heats up the adhesive. Then use the credit card edge to scrape off the decal.
With either technique, use mineral spirits to clean off any residual adhesive after removing the decals. Wipe carefully. Then give it a couple of minutes for the residual mineral spirits to evaporate.
To install the new decals: Make sure the bike is held steadily. Carefully remove the backing from the decal. This exposes the side of the decal that goes on the frame surface. Line up the decal along the side of the tube.
Note that the decals should be installed just above the centerline of the decal in an area called the "visual center". Since even from a modest distnace, we stand above the bike, you want to see the decal centered on the tube from that vantage point.
Once you locate the decal, start laying the decal at one end and work your way to the other end. Stick the decal on from the centerline of the tube, then push the decal from the centerline to the outside of the tube. This helps minimize any air bubbles under the decal.
Use the credit card to gently "squeegie" out any residual air bubbles. Once the decal has had a chance to set up, then very slowly pull back the other backing, making sure the decal sticks to the frame and not the backing.
Once the backing is removed, give the decals a day or so to set up before waxing the frame. The newest generation of "top mount" decals are very tough - so tough that they can't be removed even with a pressure washer.
Fresh decals can really freshen up the look of your Gunnar!
Note: Custom paint jobs and many bikes starting in the 2004 model year have clearcoat over decal. These decals require a finishing professional and probably a frame repaint to replace.
How about clearcoat over bare metal?
Clearcoat over bare metal looks cool and really shows off our workmanship. Unfortunately, it just doesn't hold up. Corrosion will appear under the clear coat over bare metal within 6 months. That's because the materials in the primer and pigment provide a vastly better moisture barrier than clear coat alone.
Regular paint (this includes powder coatings, too) is not a perfect moisture barrier, which is why we recommend keeping your painted bike waxed. Perhaps it is theoretically possible to keep a clear-coat only bike waxed. As a practical matter, no one can keep up with the level of maintenance required. Once even minor corrosion appears on the surface, you can't remove it without stripping off the paint.
As a result, we don't support it.
Troubleshooting
What do I do for a slipping seatpost?
A slipping seatpost is a major annoyance that adds aggravation to every ride. There are a number of measures you can take to prevent seatpost slippage:
- Apply friction paste: Friction paste prevents corrosion while containing a fine grit which dramatically increases friction and therefore holding power. IMPORTANT: remove all lubricant from the seat tube and seatpost with a degreaser before applying the friction paste, or the seatpost will continue to slip. Rubbing alcohol is not a suitable degreaser. Use a good citrus degreaser like Pedro's Orange Peelz or Finish Line Citrus degreaser.
For carbon seatposts, this can be important, as seatpost manufacturers caution against overtightening the seatpost.
Check your seatpost: Seatposts can be a bad place to save grams if they don't have the strength to give you the proper support. Mountain bikers and larger riders should stick to beefier seatposts, preferably of aluminum alloy instead of carbon fiber. Overtightening can cause "necking", where the seatpost gets narrower because of the compression of clamping on it. This tends to happen right where you most need to set the post. The only solution is to replace the post.
Also, check the seatpost diameter. This used to be a bigger problem 10 years ago than it is today, but an undersized post will create clamping problems. Thomson's 27.2mm seatpost (an excellent choice) actually measures 27.18mm for a great fit-up. Much below that, like 27.1mm, and you'll start to have problems.
- Seatpost Insertion: seatposts should have at least 6 inches of insertion.
- Clamp choice: Your stock Gunnar clamp tests out well against many clamps. If you want extra insurance, you might consider installing a super strong Surly Constrictor (30mm size). For road bikes, you install the Salsa or Thomson 28.6mm seatpost clamp.
Mountain bikers should remember that hardtails like the Gunnars are not designed for the kind of jumping that you may be used to doing with a dual suspension bike. Unless you use a lot of finesse (and not everyone can on every impact), you are putting more stress on the bike than it's really designed to take. If this is what's going on, a slipping seatpost could be the least of your problems. Structural damage to the frame and injury to yourself can occur.
Upgrading your Gunnar
What if I want a steel road fork?
You can order a stock Roadie fork or upgrade to a 22-Series Waterford custom fork which matches the Roadie geometry. Add an extra week or so to the lead time.
What if I want a threaded fork?
While a growing number of riders are moving to threadless headset designs, others like the easy adjustability of a quill stem. If you want a threaded fork, you can upgrade to a 22-Series Waterford Custom Fork. Threaded forks require a 1" steerer, while most Gunnar models are designed 1 1/8" steerers. The easiest solution to this problem is to use headset reducers, that make a 1" threaded headset fit into a 1 1/8" compatible head tube.
Assembly, Care and Maintenance
What are common dimensions and threading used on Gunnars?
Gunnar has settled on a number of standard dimensions that let you buy common nuts and bolts to attach parts to your frame:
- Bottom bracket: BSA (English) threading (1.370 x 24 TPI). Our bottom bracket is 68mm wide except for off-road designs after 2003, which typically have a 73mm width.
- Bottom bracket cable guide hole: : M5 x 0.8
- Canty brake arch: M6 x 1.0
- Canty stud: M6 x 1.0
- Crown Race Diameter: 1 inch steerer- 26.4mm; 1 1/8 inch - 30mm.
- Downtube shifter bosses: M5 x 0.8
- Dropout eyelets: M5 x 0.8
- Derailleur tab: M10 x 1.0
- Fork threading: 1 inch x 24 TPI
- Front derailleur clamp size: 28.6mm
- Front derailleur braze-on range: Braze-on front derailleur locations vary by:
- The number of teeth on the llarge chainring.
- The vendor (Shimano vs. Campagnolo vs. SRAM
- The number of chainrings (double vs. triple)
- Head tube shifter guides: M5 x 0.8
- Paragon Dropouts:
- Slider bolts: M8 x 1.25 x 18 button head (5mm hex)
- Chain tensioner: M5 x 0.8 x 35mm
- Rack Mounts: : M5 x 0.8
- Rear dropout spacing: This can specified by order, but here some typical values:
- Road bikes: 130mm
- Off-Road: 135mm
- Touring: Usually 135mm
- Disc brake bikes: 135mm
- Through-axle disc brake bikes: 142mm
- Plus-size through -axle: 148mm
- Seat Clamp Diameter: Road bikes - 28.6mm Off-Road Bikes - 29.8/30mm.
- Seat Clamp (separate): 29.8mm. Tighten to 45 inch pounds (5 nm).
- Water bottle bosses: : M5 x 0.8
How do I prevent my seatpost from either slipping or becoming frozen?
A seatpost must be adjustable to adapt to your changing fit needs. At the same time, a slipping seatpost is a major annoyance. How do you prevent either extreme?
Preventing corrosion and freezing of the post: Greasing the seat post, typically with a tough lithium based grease, is the traditional method of preventing corrosion. Carbon fiber seatpost manufacturers recommend against using grease - probably because of the increased likelihood of seatpost slippage and the need to control the clamping force. Many now recommend a "friction paste", which prevents corrosion while including a grit that prevents slipping.
Preventing Seatpost Slipping: A slipping seatpost adds aggravation to every ride. Larger riders suffer more than smaller ones, especially when riding off-road. There are a number of measures you can take to prevent seatpost slippage (assuming your are already tightening the bolt properly):
- Apply friction paste: Friction paste prevents corrosion while containing a fine grit which dramatically increases friction and therefore holding power. IMPORTANT: remove all lubricant from the seat tube and seatpost with a degreaser before applying the friction paste, or the seatpost will continue to slip. Rubbing alcohol or similar solvent does not do the job and will likely prevent the friction paste from working. Use a good bicycle or automotive degreaser like Pedro's Orange Peelz or Finish Line's Citrus degreaser.
For carbon seatposts, this can be important, as seatpost manufacturers caution against overtightening the seatpost.
Check your seatpost choice: Seatposts can be a bad place to save grams if they don't have the strength to give you the proper support. Mountain bikers and larger riders should stick to beefier seatposts, preferably of aluminum alloy instead of carbon fiber. Overtightening can cause "necking", where the seatpost gets narrower because of the compression of clamping on it. This tends to happen right where you most need to set the post. The only solution is to replace the post.
Also, check the seatpost diameter. This used to be a bigger problem 10 years ago than it is today, but an undersized post will create clamping problems. Thomson's 27.2mm seatpost (an excellent choice) actually measures 27.18mm for a great fit-up. Much below that, like 27.1mm, and you'll start to have problems.
- Clamp choice: Your Gunnar starts out with a really nice clamp. If you want extra insurance, you might consider installing a super strong Surly Constrictor (30mm size). For road bikes, you install the Salsa or Thomson 28.6mm seatpost clamp.
How do I remove the chainstay protector?
The chainstay protector has a truly high performance adhesive - strong enough to pull off the paint. To avoid damaging the paint, use a blow dryer to heat up the chainstay protector at one end. Then, as the adhesive softens, slowly pull it off. Clean the remaining adhesive with Goo-Gone (though be sure to clean off the Goo-Gone, lest it damage the surrounding paint.
Clamp-on derailleurs no longer exist for 28.6mm seat tubes. What do I do and what should I avoid?
Because the mass-production bikes have gone away from 28.6mm round seat tube, front derailleur manufacturers no longer provide a 28.6mm clamp. 1. Purchase a 31.8mm clamp version and use a Wheels Manufacturing one-piece plastic shim to reduce it down to 28.6mm. 2. Purchase a braze-on version of the derailleur and a 31.8mm clamp-on adapter, plus the Wheels Manufacturing one-piece plastic shim to make the clamp fit on a 28.6mm seat tube. Be carefull to avoid “clamp-itis” – seat tubes deformed by the front derailleur clamp. Clamp-itis has existed for years. The thinner the walls, the bigger the problem, but riders often live with it. After all, the deformed seat tube makes it harder for the derailleur to twist out of position, and it’s a low-enough stress location that cracks may never appear in the tube. Though such cracks do not be qualify for warranty treatment. The only way to fix it is a new frame. For the more compulsive of us, a dent is still a dent, so how can this be avoided? 1. Don’t use a cheap clamp. They assume you’re putting it a really heavy tube which causes the clamp to deform, not the tube. 2. We’ve come to like using 31.8mm clamps from Campy and Shimano with the right kind of shim that takes it down to 28.6mm. 3. Wheels Manufacturing has the best alternative – a one-piece shim that fits quite nicely under the clamp bus doesn’t leave gaps that allow tube to deform. Also, having a plastic shim in contact with the paint mars the paint even less than the best of the old shims. TIP: to provide the best protection under the shim, be sure to wax the area before you mount the derailleur clamp. Why don’t we just go to a braze-on front derailleur? If we were a mass production house, this might make sense, since we’d only have one derailleur for each model. Using a clamp means you can go from Campy to SRAM to Shimano, double chainring to triple to compact and never have to worry if you can’t mount your front derailleur because of the wrong location. This makes your Gunnar more versatile in yet another way.
You should get your spindle recommendation from your crank supplier. It's their design that governs chain line. Gunnar bottom bracket shells all have English (BSA) threading. Road bottom bracket shells are 68mm wide, while off-road shells are 73mm wide.
Headsets specs - which ones to choose?
These days there are a number of fork and head tube options. What headset to choose?
Steerer tube - 1 inch
Head tube for 1 inch:
Chris King Nothreadset 1 inch.
----------------------------------------------------
Steerer tube - 1 1/8 inch
Head tube - 1-1/8 inch.
Chris King Nothreadset 1 1/8 inch.
Headset 44mm:
> Cane Creek: EC 44/30 Lower - EC or ZS 44/28.6 Upper.
> Chris King Mixed Set.
----------------------------------------------------------------------
Steerer Tube Tapered 1-1/8 x 1-1/4 in.
44mm Head Tube - headset:
> Chis King Inset 8.
> Cane Creek EC 44/33 Lower / ZS or EC 44/28.6 Upper.
Tapered Head Tube:
> Chris King Nothreadset Tapered (Mixed)
> Cane Creek - EC 44/33 Lower - ZS or EC 34/28.6 Upper
------------------------------------------------------------------------
Steerer tube - Tapered 1 1/8 inch x 1 1/2 inch:
Head tube: 44mm. Options:
> Chris King Inset 7.
> Cane Creek - EC 44/40 Lower - ZS or EC 44/28.6 Upper
Head tube Tapered (34/44):
> Chris King Nothreadset Tapered (Mixed)
> Cane Creek - EC 44/40 Lower - ZS or EC 34/28.6 Upper
What through-axle skewers do I need for my frame?
Rear- nominal width- 142mm x 12mm x 1.5mm threading (full shaft length - 164mm). For Boost spacing, add 6mm. Front: 100mm. Up until mid-2018, the skewers were 1.0 thread.
Can I use my Gunnar on a trainer for winter or bad weather training?
Gunnars can be used on a trainer, but unless you prepare for this use properly, you can damage your frame. The biggest problem is from corrosion caused by sweat and humidity.
To avoid structural damage, Use rollers or trainers that mount using the dropouts. WARNING: do not use a trainer that mount using the bottom bracket. This can damage the frame structurally.
How to avoid corrosion problems:
- Wax your frame before your indoor training season.
- Apply internal corrosion preventative (like JP Weigle's Framesaver) to prevent humidity from eating your frame from the inside out. Application should happen every two years or so.
- Use a fan to help your sweat evaporate. This also makes you more comfortable and helps you train harder. It's a good idea to leave the fane on for a while after your session to let things dry.
- A periodic wipe down with a wet (with non-sweaty water) cloth helps get rid of excess salt on your bike. Consider using a water spray bottle to wet your frame when toweling it down and start with a clean, dry towel. Here's a handy test: when yu apply the spray, if water still beads up on your frame, that wax is in good shape. If the spray "wets" the frame, it's time to apply more wax.
- If you sweat big time or if your sweat is acidic, you might consider using a product like the CycleOps Bike Thong Bicycle Sweat Protector for Indoor Bicycle Trainers to protect your gear from sweat. Corrosion can also affect other parts of your bike, like the front derailleur, cables and so on.
We can't comment on every crank and BB combination but today's CrossHairs should fit all standard road and even off-road configurations.
A few of the early (1998-9) CrossHairs had bent chainstays. It fit triples fine, though, giving riders a 52/42 big chain ring option.
You can order touch-up paint and other small parts in the order section of our web site: http://gunnarbikes.com/site/order/ If you don't find your color, just call 262-534-4190 during regular business hours.
Corrosion - how do I prevent it?
Though Gunnars are designed to last a lifetime, they, like any good bike frame, do require basic care to protect against corrosion-related problems.
Annual Overhaul: Like any good bike made of any material, an annual overhaul prevents mechanical problems from occuring such as frozen bottom brackets and stuck seatposts. Your shop is well equipped to perform this work.
Internal protection: If you plan on riding your Gunnar in bad weather, applying Framesaver (tm) or linseed oil to the internal surfaces - especially in the chainstays and bottom bracket area - is very important. This is particularly important in areas where salt is used to melt snow and ice during the winter. Re-apply every 2-3 years. After application, be sure to clean off any Framesaver on the surface in order to avoid the potential for damage to the paint.
Fair weather riders don't need this kind of attention. However, after riding in wet conditions, all riders should hold the bike up with front wheel over the rear to allow water to drain out. Evaporation will rid the insides of residual moisture.
External Protection: Polyurethane enamels are, at a microscopic level, porous and, for long-term protection, require waxing. It takes 2-3 months for paint on the frame to fully cure. During this period, if you want to wax your frame, use something very light, like Pledge. After 90 days and after cleaning dirt off the frame, apply a non-breathable wax such as Meguiar's Tech Wax or Turtle Wax.
For most riders, a once a year waxing with your annual overhaul is all the external treatment needed to keep your frame in top shape. If you ride in tough winter conditions or you ride in particularly corrossive environments such as near the ocean, you may consider a semi-annual re-waxing.
If you apply a wax-stripping cleaner/polisher, be sure to re-wax the frame.
Once waxed, periodic cleaning with gentle soap and shining it up with Pledge will keep your bike looking great.
Pledge alone will not provide an appropriate level of surface corrosion protection. It lacks the durability and UV protection of wax. You need a real wax job.